
Now on to the coilovers: I shall proceed the following by saying that modifications are all intertwined, mess with one aspect and sure enough you are going to have to mess with something else. Don't think any single modification is a stand alone task. So what happened with the PFS springs? The answer, I began to notice I was running out of "spring." By this I mean with the bigger front sway bar I found I was dragging the sway bar brackets on moderate road undulations, and was noticing considerable dive under hard braking. Thus, I wanted/needed stiffer springs. And if I was going to get stiffer springs I might as well do the coil over conversion while I was at it. I decided on the Ground Control kit purchased through Nick Riefner at N-Tech Engineering out of Florida. Why Ground Control? Essentially recommendations from others and a price that was palatable
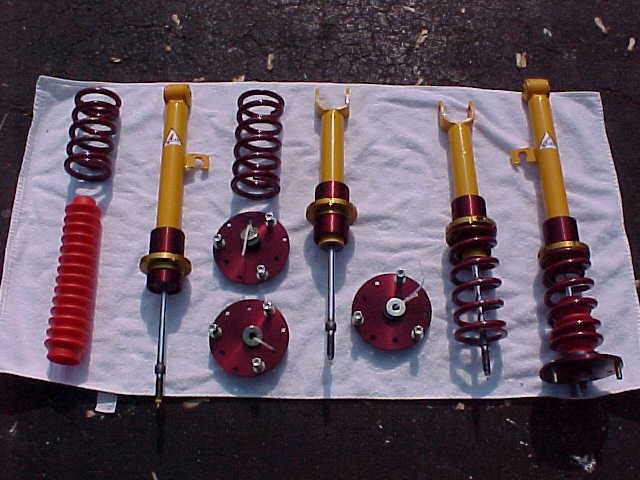
The above pictured components supplied for each corner |
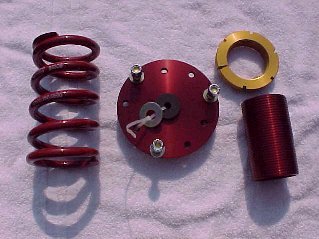
The GC kit comes complete with front and rear upper camber plates (non-adjustable) that do away with the monstrous OE rubber bushings, threaded sleeves constructed to fit the Koni sport shocks, and spring seats to match, plus your choice of 2 1/2 inch diameter spring supplied by Eibach. All the parts are red or gold anodized and made from machined aluminum. All in all a nice kit. For the do-it-yourselfer however it should be noted that the threaded collars AND camber plates are different front to rear. The recommended spring length for the third Gen. RX-7 are 6 inch for the front and 7 inch for the rear. Spring rate has and will be the subject of much debate. My spring choice was based on a front to rear ratio of the stock springs and by the recommendations of other track compatriots running ultra stiff spring setups. I ended up choosing a VERY conservative 550lb/in front and 400lb/in rear spring. |
|---|
| When I say conservative there are some running spring rates as high as 800lb/in front and 600lb/in rear! For reference, the stock springs rates are 281lb/inch front and 200lb/in rear. So now I have springs that are twice as stiff as the OE spring. And the OE spring rates which I thought resulted in a "bone jarring" ride! The solution (I think) is in the use of adjustable shock absorbers. In my case the Koni sport single adjustable version. With this combination I can soften up the ride somewhat for the street, yet go very firm for the track. After initial test drives I have found the ride to be quite compliant with the shocks set halfway from "full hard." And not nearly as harsh as I had imagined. | 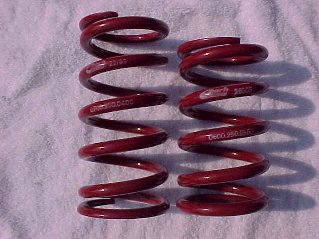
Eibach ERS springs: 7"x2.5" 400lb/in rear, 6"x2.5" 550lb/in front |
|---|
Installation was fairly straight forward with some notable nuances to assembling all the parts. The camber plate shock bushings had to be enlarged slightly to fit the slightly larger piston threads on the Koni shock. This would not be a problem on an OE shock. As mentioned earlier.
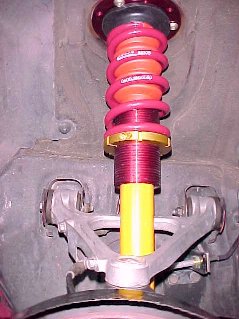
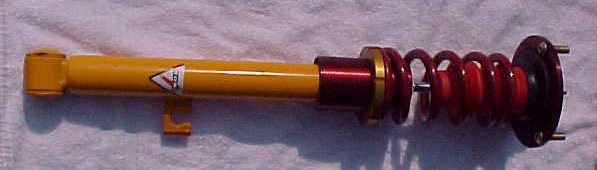
Front assembly installed. Note: 4x4 spring boot |
The camber plates are front the rear specific so make sure you match up the right shock with the right plate. And the threaded sleeves are also front to rear specific. I set the Koni C-clips on the middle perch. As pictured, notice the use of the red shock boots. The OE shock boots are made for an OE diameter spring so are unsuited for use in the 2.5" Eibach ERS spring unless they are cut lengthwise. Something I was unwilling to do. So I purchased some generic 4x4 accordion type shock boots and cut approximately 4 inches from the narrower end and used it. The color match leaves much to be desired but the fit was almost perfect. Fitment of the entire assembly onto the car was fairly straightforward, the only hiccup being the need to file about 1mm off the lower bushing on the Koni shock to allow it to slide into the lower A-arm more easily. Apart from that it was very easy with the added bonus that no spring compressor is required during the whole process. Simply thread the spring perch all the way to the lowest level and compress the shock and it will fit into the suspension with no problem. And voila one ride height adjustable, compliance adjustable, stiffer than stock, and smart looking to boot, suspension. Now we shall have to see how it works on the track! |
|---|

"Why I need BIG BRAKES!"


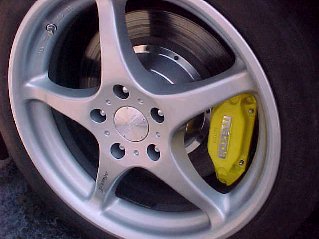
Rotor with original non-gas slotted faces. |
As far as the big brakes kits go this has got to be the bargain of the century. The Mandeville Big Brake kit retails for about $1100.00. Compare this with the CoolTec, Mov-it, Brembo, or AP Racing kits that all hover around $2400.00 plus! Although Mostly Mazda has since introduced a VERY cost effective 13" rotor w/6 piston calipers that fit the OE 16" wheels for $1600, not bad! But the secret to the Mandeville kit is in its use of OE calipers. Mandeville requires that you send your stock calipers to them. They then split the caliper half's and insert a 1/2" alloy spacer allowing the caliper to span the increased width of the larger brake rotor. The calipers are then rebuilt with new seals and boots. Also included are longer brake pad pins. Yellow lacquer is my own effort. As far as stock calipers go the OE caliper is super. A side benefit of the calipers is also the ability to still use stock (sized) brake pads that can be purchased virtually anywhere. It's lightweight, compact, and as far as OE 4 piston calipers go it's as good as it gets. |
|---|
| The modified OE calipers are nice but the meat-n-potatoes of the upgrade is the rotor. A full 13 inch diameter Coleman rotor mounted on a machined alloy hat. With each mounting bolt painstakingly safety wired. The rotor uses a curved vane design (verses the straight vane on the OE rotor) and is 1.125 inches thick. I have also had my new rotor set gas slotted and heat treated for added longevity. The surprising fact of this whole assembly is that it is lighter than the stock setup! The installation was elementary. A short extension bracket is mounted to the hub and the modified caliper mounted to the extension bracket. No modification is needed to the brake lines. The only alteration I found necessary was to trim the upper lip off the rotor splash shield in order to clear the larger diameter rotor. I also decided to use two of the longer "M" springs to hold in the brake pads verses the one short and one long configuration. With the increased distance to be spanned by the springs I wanted a wee bit more spring force separating the pads. | 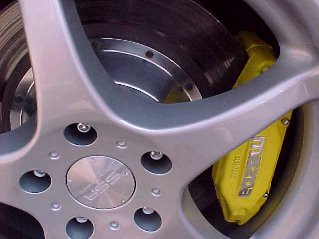
Note adequate clearance for caliper in 17" SSR wheel |
|---|