Information contained above this line was not contributed by the owner of this site


BATTERY RELOCATION

WHY MOVE THE BATTERY IN THE FIRST PLACE?
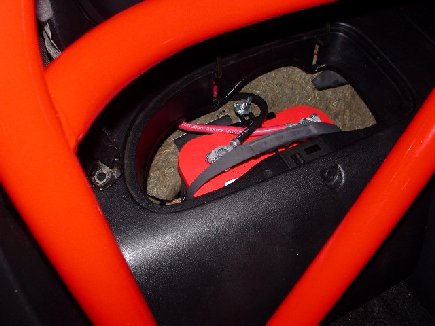
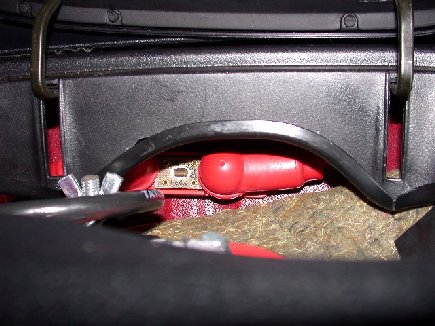
As usual I will begin by stating my reasons for wanting to move the battery from the OE location. There are several. The first is rather simple as it applies to the dynamics of car control. A car with weight hung outside the wheel base of the car will not be as responsive as one with that same weight placed within the wheelbase (polar moment of inertia). The battery, essentially a 50lb chunk of lead and liquid is placed right on the front left corner of the car, ugh. My desire is to move it to the middle of the car placed in the location previously occupied by the passenger side rear bin. The second reason is one pertaining to cooling efficiency. As it is well known cooling an RX-7 under all conditions, be it street or track driving, can be a challenge. The battery sits directly over the left side of the radiator effectively blocking airflow. Additionally the battery acts as a heat sink so once hot does nothing more that radiate heat into the engine bay delaying the time it takes to cool the car down, whether it is moving or stopped. And the final reason is that if one desires to utilize a large intercooler the battery either must be relocated or replaced with a mini battery of some sort. So thus in my opinion it was time to have a go at moving the battery. But you will probably ask why not use one of the battery miniturization kits (aka BMK)? Well, being the person that I am I frequently run the fans with the engine off for long periods of time - I forget. So have killed my stock battery many a time. The mini batteries are just fine for running the car but if the car doesn't start by the 3rd try...give or take..then it's done. The BMK's have the capacity to start the car but not the reserve to run auxilliaries for long periods of time. I feel I need the reserve.
THE TASK AT HAND
What did I purchase to facilitate the install?

An Optima Red Top battery purchased off eBay for $100, This mainly for its;' reputation and reserve capacity. Yes it is about as heavy as the OE battery but in this regard I don't think I have taken a step backwards
From Summit Racing a Taylor Vertex battery relocation kit for about $40, 
[which included 16 feet of red 2 gauge wire, 3 feet of black negative 2 gauge (both with battery terminals already attached), a battery tray, battery hold downs, and tray mounting hardware]
A Blue Sea Marine ANL fuse holder with a 150Amp ANL blade fuse, also for about $40.

My total cost for the install was about $200 when all was said and done. So on to the relocation effort.


Viola! No battery.

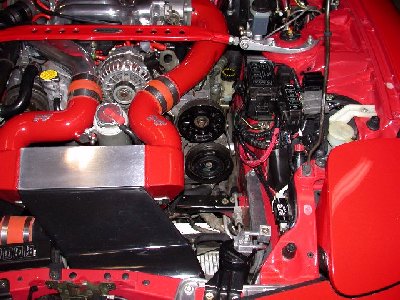
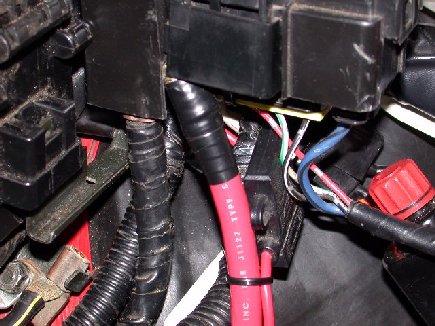
The new engine bay void. Note various issue to be addressed: numerous harness rerouting tasks,
relocated main fuse block, relocated fog light relay, terminated negative battery cable,
auxilliary ground cable, reterminating accessory wiring to fit main fuse block lugs, etc. etc.
I shall begin by saying this has to rank up near the top as one of my all time biggest PIA activities I've done. I'd estimate well over 15 hours, It's not that it's hard it's just that there is so much to do. Virtually no part of the car is left untouched. To wit - my notes describing the trials and tribulations I experienced during the effort:
Remove stock battery. Look at all that space! IC upgrade?
Stand and stare at wiring mess for 30 minutes trying to figure out what the hell to do with such a disaster area.
End up disconnecting virtually every connector in the vicinity and rerouting everything.
Find a new location and mount the fog light relay 
Develop prototype and fabricate bracket to eliminate need for zip tying the crap out of the whole mess. Of all the relocations I've seen, all have used zip ties by the hundreds to secure the fuse block and wiring previously mounted to the positive battery post - no way I was going to do this...there had to be a better way. Hence the bracket I ginned up to firmly anchor the fuse block (see picture below)
Reterminate positive cables ends for fog lights and shift light (too much wire and wrong size ring terminal for fuse block)
Take a breather and look at what is ahead.

It was going to be very tough with the roll bar! So here we go:
Remove scuff plates
Remove passenger side seat (drivers side seat might have made things easier too but I decied to leave it in)
Remove both shoulder harness straps
Remove door seal trim
Remove rear hatch carpet.... and then the fun begins.
Remove seat belt anchors which means unbolting harness lap belts which is a real PIA due to absolutely no room to work
Try to remove two side panels. Ummm not without removing the roll bar!! RATS!
Ok...step back and think.
Remove strut tower covers and rear jack and tool bin covers
Remove rear support legs for roll bar and loosen bolts to main hoop and tilt bar out of the way as I work
Now can remove side panels. Wincing as the clips release and hoping I don't break any...for the record out of all the clips on all the panels I only broke 1 and that was because the manual said there was a screw there, which I couldn't find, and not a clip
Go to remove rear bins (fighting to hold roll bar out of the way) nope not gonna go have to remove rear strut bar so
Remove rear strut bar and remove bins

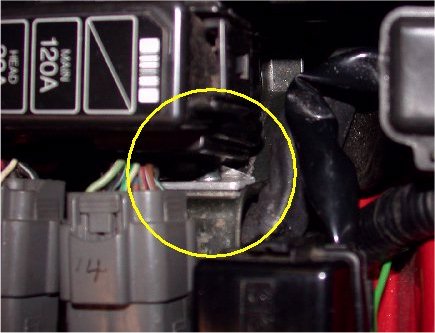
View of the alloy bracket and mounting point for main fuse block
WHEW! The Half Way Point...Sorta
Install battery tray. Drilled 4 holes through floor pan and used some hefty 3/8inch bolts.
Bolt down new battery
Attach ANL blade type fuse block to rear bulkhead (pictured)
Figure out where to attach ground cable and install it. And lo and behold there is an M12 prethreaded hole already right next to the where the battery will go - apparently used for seat belt anchors for cars fitted with rear seats.
Figure out where to run positive cable. Perfect hole in floorpan, under where the bins are located, already there Perfect size for a rubber grommet and the 2 gauge wire. Thank goodness for small miracles
Drop 16 ft of cable through the hole in the floorpan
Jack up car to run cable. I used the route taken by the brake and fuel lines under the car. Took a bit of fiddling around but it works and it keeps the high power battery cable away from the main wiring harness.
Cut positive lead and splice in ring terminals to route through fuse block near battery. For safety measures the fuse block needs to mounted no more than 16 inches from the positive battery terminal.

Closeup of positive lead termination at main fuse block
And then the fun begins....measure, and measure again and again where the bin must be cut in order to clear the battery. After much procrastination the bin is cut. Clearence is spot on, whew!
Reinstall bins (more on this later) while fighting to hold roll bar out of the way.
Reinstall drivers side rear side panel - no problem
Reinstall pass side rear side panel - 7 of 8 clips catch and one won't grip. Decide to press on. Reinstall remaining clips and screws that hold panels in and do a test fit fo the center divider panel. It DOESN"T FIT! AAAAARRRRRRGGGGHHHH.
Remove pass rear side panel again and find out flange on bin is caught above an electrical connector when it should have slid underneath it. Visibly you could not see a problem but it caused the bin to sit about half an inch too high in the rear left corner causing that one side panel clip to not catch. Fix this problem by completely unbolting bins *again* and sliding flange under that wretched connector
Reinstall side panel which now fits perfectly. MORAL: if it doesn't fit right then something IS wrong.
Reinstall all the clips and screws that go with it.
Reinstall door seal molding
Reinstall rear hatch carpet
Reinstall rear strut bar
Reinstall rear roll bar legs and tighten down the whole roll bar assembly
Reinstall trim panel covers
Take car down of jackstands and survey the carnage
Go to bed thoroughly exhausted
THE NEXT DAY - Final Steps Towards Completion.
Reinstall seats.
Reinstall harnesses
Reinstall camera mount
Terminate positive cable and bolt it to main fuse block in engine compartment. Now this was tricky. How does one solder on a ring termal to a 2 gauge wire when all you have is a pencil soldering iron? Well with a butane torch. Actually I drilled avery small hole in the ring terminal casing and heated the tip of the terminal with the cable end inserted in the terminal. Then it was simply a case of feeding in the wire solder through the hole until the terminal was completely full of liquid solder and had fixed the cable end in place.
Complete finish work on bracket to ensure it doesn't ground out one of the positive leads
Terminate old negative battery cable at the first grounding point and run an auxilliary ground cable from the chassis to the block.
Wrap all those loose wires all over the place in engine bay
Connect battery in rear and hope the car doesn't instantly fry itself.
Breath sigh of relief and no sparks or burning smell is noted when key is inserted for the first time and swear it's a job I'd rather not repeat!


The Optima battery in it's new home. (left) The 150Amp ANL blade fuse mounted near new battery location. (right)

POSTLOGUE

Well not so fast. After the battery relocation effort about a week later I decided to take the car out for a spin. Started up fine as usual but... ...the car just didn't seem to be running well. Had good boost, had fuel, but also had what felt like a miss at part throttle and a hesitation off idle. Also lower than usual vacuum (11-13 vs 15-17) and no real power above 4.5k rpm. Made all the right noises though but it just felt like I was dragging a truck behind me. There were no error codes either. Well it turns out I had a bad connector pin at the ignitor going to the coil. Resulting in a car running on only 2 spark plugs! In the process of running the battery cable I must have pulled a wee bit too hard on one of the cables and dislodged the pin in the connector. With the connector now fixed the car runs well, just like it used to.
SURPRISE! MY CAR THE TIME CAPSULE

On a much more refeshing note when I removed the bins for the first time much to my amazement there was a piece of Japanese newsapaper, from 1992. The line worker in Hiroshima apparently must have just come off his break when working on my car and left a peice of the newspaper in the car when it was being built. Pretty cool I think.
TRIPLE-R MAIN PAGE
GENERAL OVERVIEW | THE HEART OF THE BEAST | STOPPING AND TURNING | THE COMFORT ZONE

7-UP CLUB MAIN
OUR "LOCAL7" COMMUNITY | THE WORLD OF THE RX-7

This page last updated October 18, 2001
rotorphiles have visited this page since October 18, 2001

If you would like to contact me and converse about my experiences with my 7: please feel free to send an e-mail to rotarypower@rx-7.net

Disclaimer: All images contained on this page are the sole property of C. Regan or were collected from the public domain, unless otherwise indicated. If any image contained on this page is considered private property. Please contact Christopher Regan.Webcounter supplied courtesy of