Information contained above this line was not contributed by the owner
of this site

UNORTHODOX UNDERDRIVE PULLEY INSTALLATION NIGHTMARE
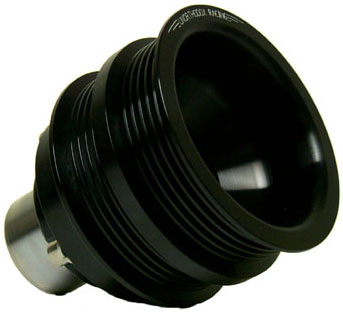
Unorthodox Main Underdrive Pulley
|
One of our members was victimized by an Unorthodox underdrive pulley
installation gone awry. Before getting into the gory details it should
be said upfront that there is nothing at all wrong with the Unorthodox
pulley itself - in fact it is a very nice piece, It's light, machined from
billet aluminum and has a nice finish. It performs exactly as advertised.
The problem is it is VERY VERY difficult to install correctly. Even the
professionals have had their fair share of problems. And the only indication
of an incorrect installation is a slight wobble in the pulley when the
engine is running. Then after a few thousand miles of use all hell breaks
loose. Read on if you dare!
|
Our victim installed the Unorthodox pulley and had the telltale wobble
and decided it was worth the effort to see if this wobble was truly an
issue. But first a little background. To install the Unorthodox pulley
the old pulley must be removed. This consists of the pulley itself and
the hub the pulley is bolted to. This hub is held on the end of the eccentric
shaft by one big bolt. This bolt not only holds on the hub but also holds
in place a whole series of bearings, races, and oil pump hardware (gears
and chains). What happens is when this big pulley hub bolt is removed,
tension is lost that holds all this hardware in place. The eccentric shaft
bearings then drop out of position so when you go to bolt it all back together
and turn the engine over... hey presto one big chewed up mess. Sure the
engine will run, but it won't run for long.
So what to do? Read on......
First you need to take all your patience and remove everything from
the front of the engine. Also, you need to remove the oil pan to do it
correctly. To give you an idea of the extent of work needed to fix this
mess the workshop manual it tells you the motor needs to be removed! However,
our victim successfully performed the work with the engine in the car.
Disclaimer: This is NOT an all inclusive instruction
- merely a guide to provide insight as to the severity of damage that can
occur.
Ok Lets begin....remove the following:
Aircleaner and all hosing from the intercooler and piping, intercooler,
alternator, water pump housing, oil metering pump/harness/oil lines, power
steering pump, ac compressor, aluminum bracket for the above mentioned,
oil cooler line from front cover, vacuum tank.
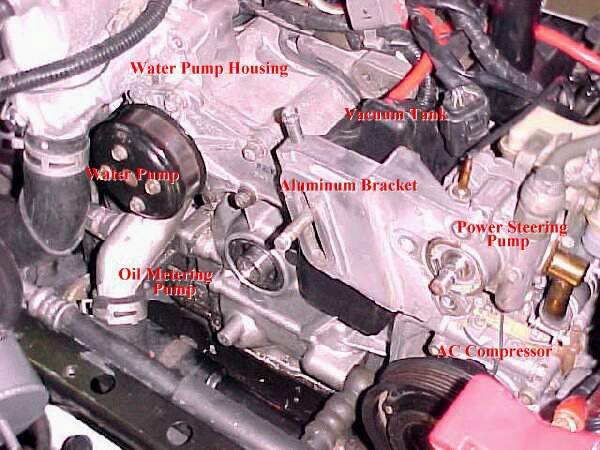

Water pump housing removed - "front cover" is center of picture
|
Next move on to the front cover:
remove the oil pan bolts to front cover
and remove the oil pan
(this requires dropping the engine sub frame! Scared yet?)
Remove all the remaining bolts on the front cover
and slide it off
|
Then remove oil pump gear locking tab and nut. Remove oil metering
pump drive gear from eccentric shaft (slides off). There is a tiny key
that goes to the oil pump shaft...DO NOT LOOSE IT!! (this sometimes has
to be filed just a bit to get it in the key way slot such that the oil
pump gear will fit correctly. Remove counter weight on eccentric shaft
(slides off) [Sorry no pictures of this stuff]
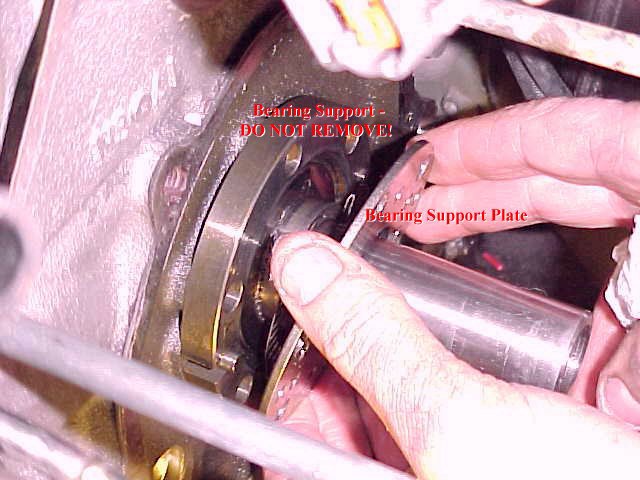
Now we get to the heart of the problem:
Remove the needle bearing (which has probably been destroyed) and the
front bearing support for the engine with six bolts in it. Remove the bolts.
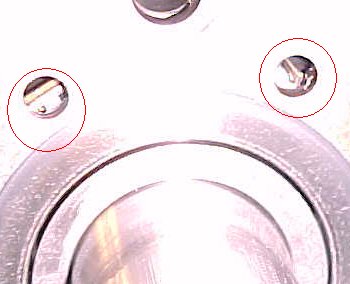
Is that a needle bearing in there? Visible through holes
in the front bearing support. Notice how the bearing has "dropped down."
Remove thin plate only (which has also probably destroyed) WARNING:
DO NOT REMOVE THE WHOLE BEARING SUPPORT AS THE ROTOR WILL FALL OUT OF PLACE
AND THE ENGINE WILL HAVE TO BE COMPLETELY TORN DOWN TO REPAIR
There is then the second needle bearing (also probably destroyed)
On the eccentric shaft is a small collar that the needle bearings ride
on (again this will probably be destroyed - are getting the point yet?)
Note: If needed to be replaced you have to mic it for correct size.
There are over ten different sizes available. It is imperative that the
right one is reinstalled. Ok so here is what we found:
Removal of front bearing support plate.
Remains of inner needle bearing.
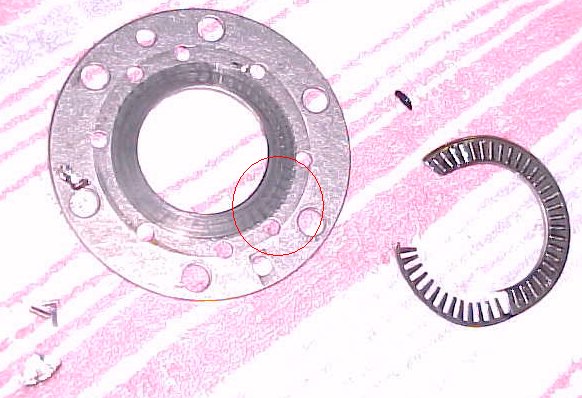
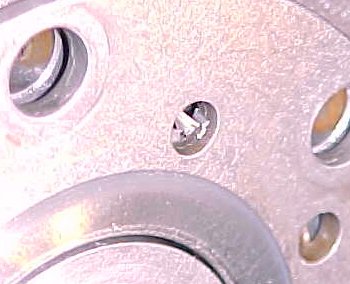
Support bearing plate - notice chatter marks (circled)
and few remaining bearings.
Where did all the bearings go? Most were fished out of the oil pan
but it is presumed that some were simply ground up and will eventually
be caught by the oil filter - one hopes.
Ok, now that the bits and pieces are strewn all over your garage
and you are wondering how the hell you are going to get it all back together
its time to begin :-)
Once you have all your new parts (about $130.00 worth), install
in the following order: Most importantly is to slide the small collar on
first, all the way against the bearing support Install the needle bearing
with vaseline.
Then the plate with the bolts (loctite on the bolts) Then the other
needle bearing. Counter weight. Oil pump chain and gear and the the drive
gear for the metering pump. Note: when the gasket for the front cover is
reinstalled there is also a plastic ring and o-ring for the oil passage
between the front cover and engine. Attach this to front of the engine
with Vaseline, making sure it stays or you will loose all oil pressure.
Yikes!
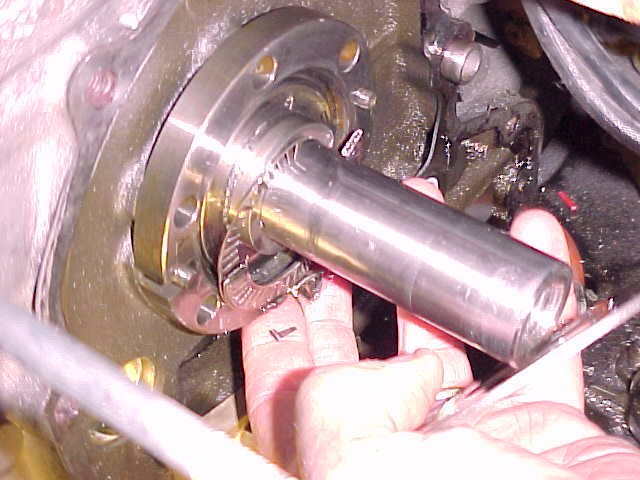
Once you got the front cover on the first thing to do is install
the pulley and bolt. Torque it down and then install all the rest in reverse
order.
Whew!
Any Questions?
"THE TRACK!"
TRIPLE-R | THE WORLD OF THE RX-7
MAIN PAGE
This page last updated April 17, 2001
 rotorphiles have visited this page since April 17, 2001
If you would like to contact the 7-Up Club and converse about
our experiences:
 please feel
free to send an e-mail to rotarypower@rx-7.net
please feel
free to send an e-mail to rotarypower@rx-7.net
Disclaimer: All images contained on this page are
the sole property of C. Regan or were collected from the public domain,
unless otherwise indicated. If any image contained on this page is considered
private property please contact Christopher
Regan.Webcounter supplied courtesy of 